
Winkelmand
Nog geen producten in je winkelmand

When it comes to choosing a hairstyle, there are so many options that it can be overwhelming to find the perfect one. You might also have questions about styling and maintaining box braids with curly hair to keep them looking fresh and healthy.
Box braided hairstyles are one of the best and most secure protective hairstyle that is great for giving your curly hair the desired break that it needs sometimes.
Although box braids have been a popular trend for years, mastering this hairstyle requires focus and commitment to learn the proper techniques and haircare routines.
In this article, we’ll be taking a journey through all you need to know about Box Braids with curls.
Box braids are a protective style that gets its name from the box shape sections around the braid. To create a braid you have to part out a section of hair. You can do this in different kind of styles, which you will attach the hair and start braiding down to the end.
Protective hairstyles like box braids and twist are designed to minimize hair manipulation and protect the ends of your natural hair, reducing breakage and helping retain length. They also help maintain moisture and shield hair from environmental damage.
Also read: Twists for natural hair: The simplest protective style
While most box braid styles leave the hair straight just as the braiding hair comes in the pack, you might want to add a twist and curl the end of your box braids. But while most box braid styles leave the hair straight just as the braiding hair comes in the pack, you might want to add a twist and curl the end of your box braids for a more and playful look..

Braids have deep roots in African culture, dating back to 3500 B.C. This traditional style originated with the Himba people of Namibia, who called them Eembuvi braids. They used intricate braiding techniques as a form of cultural expression, symbolizing things like identity and status.
In ancient times, African women created box braid fiber skull caps using wool, human hair, or felt, from which they would plait the box braids. This showcased their skill and creativity. they would often decorate their braids with accessories like jewels, cowrie shells, and beads.
The tradition of decorating box braids continues today, adding a personal and cultural touch to the style. nowadays, box braids are often styled by combining synthetic hair and natural hair, allowing for more length and versatility while preserving their traditional style.
While you can definitely get box braids done in a hair salon, it’s also a possibility to DIY. Paying to get box braids with curls can be very pricey and time-consuming. So doing them yourself can be a great alternative.
Just like any other style, your natural hair should be protected and cleansed before adding a new hairstyle. So use a moisturizing shampoo followed by your favourite deep conditioner. Then apply your leave-in or heat protector and dry each hair section separately.
Also read: 6x How to wash your hair CG proof
Section your hair off into as many parts as desired and then begin to make smaller parts within these sections. Use your comb to break up the braiding process.
The small parts will be the size of your braids. So you can decide for yourself how big or small you want them to be. If you want tight curls, you’re going to separate your hair into smaller sections, and if you want looser curls, make the sections bigger.
If you are not sure if you want thick or thin braids, than play it safe with medium box braids.
Make sure you use a great precision rat tail comb for effortless, clean parts. Use hair bands to section off the hair you’re not braiding and keep it out of the way.
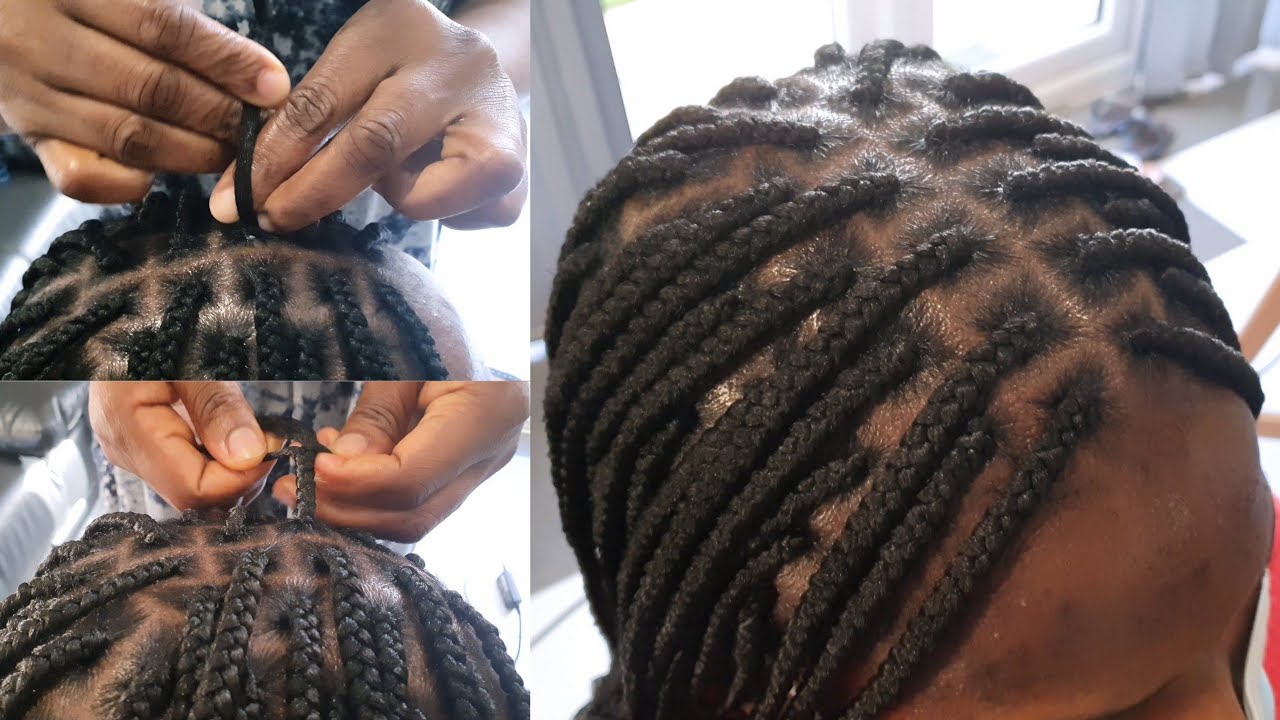
Now we will get to the fun part: braiding your curly hair. Before you start, take a piece of braiding hair and place it on top of the sectioned off piece of hair.
Then you will start a three strand braid:
When you get to the end of your natual hair, it’s time to feed it into the braiding hair. You have to keep everything in place with a good braid instal.
To add shine and memory to your box braids, use your favourite gel. So it is easier to control the crunch and it is also safe to use on synthetic hair.
Extra pro tip: keep detangling your hair as you go, the smoother your hair is the longer your box braids will last.
You are almost done! You only have two sections of hair fort your three strand braid. Split one of the two sections to make three again and continue braiding all the way down. Keep using your gel to keep your tight curls in place.
When all of your braids are done, seal the curly ends of the box braids with hot water.
You want to complete your look so your box braids will look awesome! Use an edges brush of toothbrush to lay down your baby hairs. In this way you will achieve a polished look.
The time it takes to get box braids done depends on the braid size hair length and thickness. On average:
Small Box Braids: 6 to 8 hours – These take the longest since the sections are smaller and need more detail.
Medium Box Braids: 4 to 6 hours – The perfect balance between braid size and time
Large or Jumbo Box Braids: 2 to 4 hours – This is the quickest option due to fewer and thicker braids.
Now that we know how to make box braids, why not take it up a notch? Curling the ends is a great way to give your box braids that extra touch of style, perfect for special occasions or a night out.
If you want to recreate natural curly hair it is easy to achieve this with a curling iron. BUT, if you have synthetic box braids, the heat can ruin them in a flash. So it’s a real no go when you have synthetic box braids. So avoid any contact with the heat unless you want to say goodbye forever to your beautiful box braids and curly ends.
But if you have natural box braids, then you can continue to unbraid them after the curling procedure. With the curl iron you’ll get amazing voluminous curls.
The simplest way to curl your box braids is to dip them into a boiling water. Make use of rollers to roll your braids. Then cover your face with a towel in order to not get burned.
Dip the hair into hot water for a few minutes. Afterward, remove the rollers fast and the beautiful curls are ready.
Disclaimer: this method is risky because there is a possibility you can burn yourself. Make sure to watch your safety when following this method.
We have a few smart tips for you to make the curling process faster and easier for creating the perfect curly ends:
Prevent dryness: add a few drops of oil to the water. The oil helps seal the moisture in.
Use distilled water: this is a better option that tap water because it’s much softer and doesn’t have any mineral deposits.
Consider perm rods when using rollers for making curly box braids: because they are made form a durable plastic, it can withstand the heat well. But in the same time, they have elastic bands that helps to keep the curls in place.
Curl your hair extensions before attachting them to your hair: follow the exactly same procedure. Just submerge the extensions into the water and leave it boiling for an hour or two for the long-lasting results.
Now we know how to create box braids. But there is also a whole world about different way to style your box braids. Although there are dozens of different types of box braided styles, we’ve narrowed it down to our five favorite ways to style box braids. These styles will work amazing with both natural hair colors and bold shades.

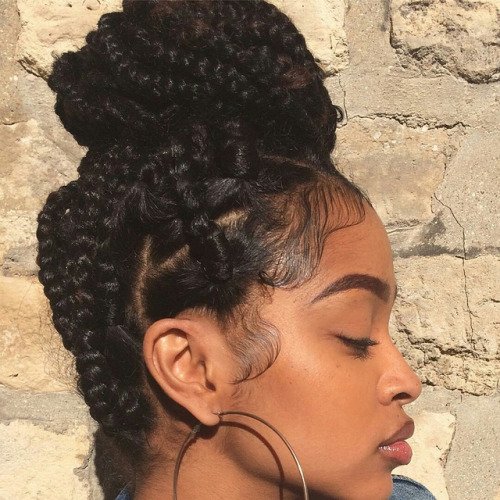
This is a casual style with just a bit extra. Section off the middle of your hair and tie it into a loose bun. Don’t make it too tight to avoid tension and breakage around your hairline.
This is a perfect hairstyle for a formal occasion, but ofcourse this is also great on a regular day. You can wear your box braids either in a high bun on top or a lower one more to the back of your head.
This quirky hairstyle is a laid-back. It is very easy to do and ideal for casual settings. Separate your hair into two small sections and secure each side with a hair tie.
This look ties two trends into one! Update your look with a single chunky French braid. Try a fishtail braid to switch things up, or create two to double the fun.
Extra-long ponytails are a big trend. Gather your hair up to the side or center of your hair and secure with a hair elastic. If you want to give the look a more polished finish, opt for tying one of your braids around the base of your ponytail to hide your hair tie.

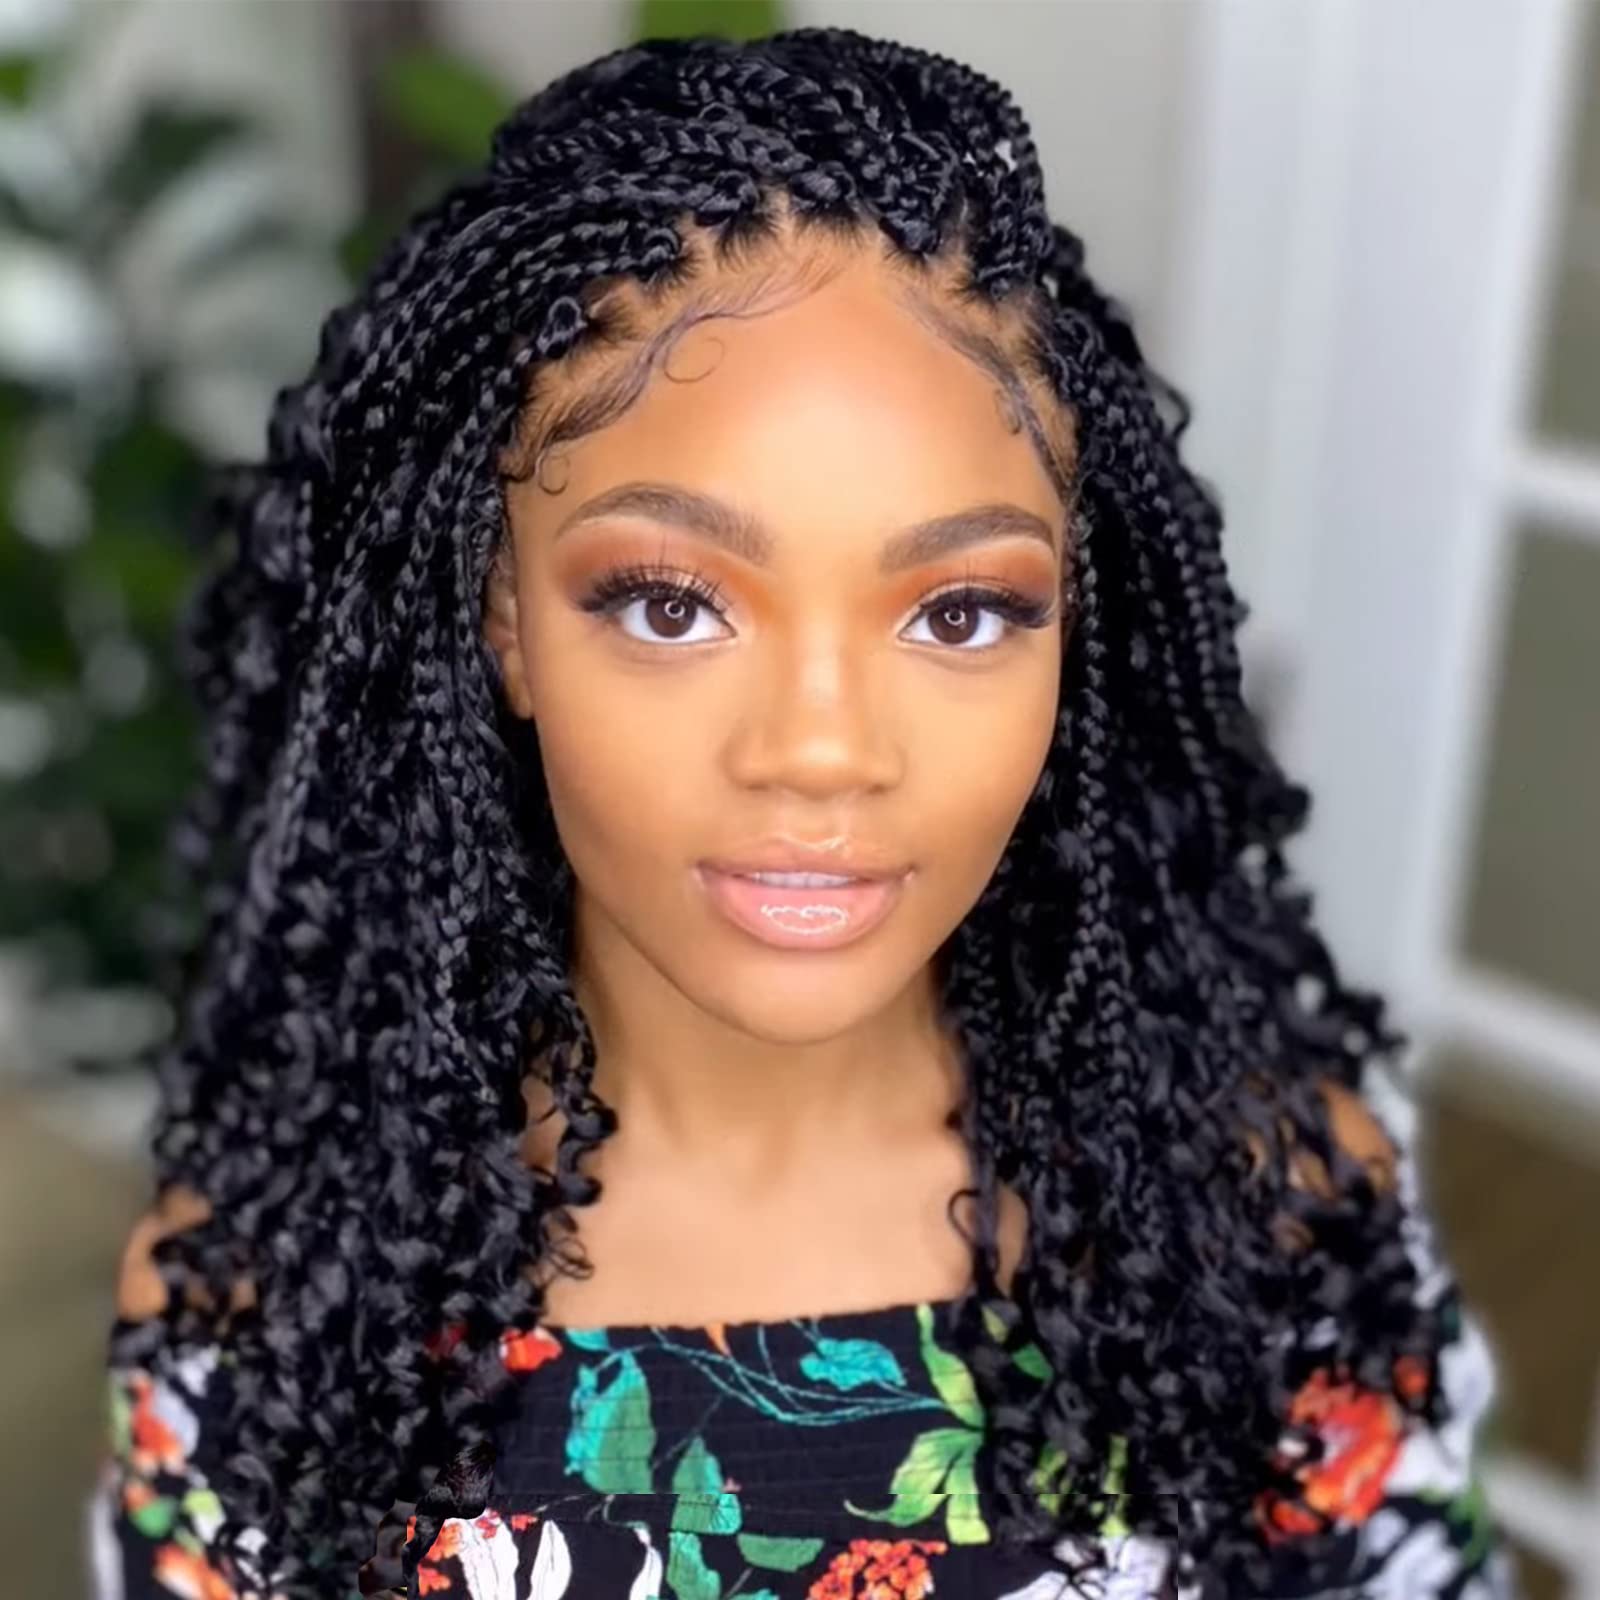
Bohemian braids, goddess braids and gypsy braids are all the same thing. Braid the curly hair in at the end of the braids to achieve curly ends. There are different ways to create goddess braids hairstyles.
Bohemian braids are mostly done on traditional box braids or the increasingly popular knotless box braids.
Long goddess braids are braids that are super long and are worn to one side. It is a stunning and glam hairstyle that makes turn heads.
Box braid will typically last for 4-6 weeks. Keeping your braids in for too long may be tempting, but it can cause breakage, matting, and buildup on your new growth.
If you want to stretch your time, we suggest getting the hairline and nape redone around the six-week mark.
It’s important that you maintain your braids so that they stay frizz-free as long as possible. A satin bonnet, scarf, or silk pillowcase will protect your hair while you sleep. We will give you more tips on sleeping with box braids later on in this blog.
Because you will be skipping shampoo for a few weeks we recommend to get a scalp cleansing rinse that you can use while your braids are installed. This will allow you to maintain your protective style a bit longer. Use a co-wash for this which will clenase, condition and nourish your scalp.
You can also DIY and make your own hair rinse. Use ingredients like apple cider vinegar, tea tree oil and/or shea butter.
How often you’ll need to wash your box braids depends on your hair’s needs. Some women have drier scalps, so they are more prone to dandruff. But for others they have to rely on more styling products which can lead to excessive build-up.
Other lifestyle factors such as working out and sweating a lot can leave your braids a little odorous.
Conclusion: you’ll know when it’s that time again to wash your braids. But how?
To wash your box braids you’ll need the following things:
Conclusion: you’ll know when it’s that time again to wash your braids. But how?

With wet hair it will be easier to wash your shampoo out more easily. Divide your hair into sections so you are sure that you have cleansed all the braids.
This will not be a way of working that you are used to. The goal is to avoid frizz, so don’t just pour shampoo into your palms and then rub it in. Instead, use the Clarifying Shampoo and put generous amounts onto your fingertips and massage the shampoo directly into your scalp.
The reason why you use a clarifying shampoo is because they don’t require extra rubbing in order to thoroughly cleanse your scalp.
Stand in the shower and let the water rinse out as much shampoo as possible. Try to avoid using your fingers, as this can cause frizz and unraveling. If your hair smells a little bit funky, you can add a bit more shampoo. Start at the root of the braid and let it slide down before rinsing clean.
Just like any other wash day routine, conditioning is essential. Not only does it keep your scalp nice and hydrated, but it also leaves your box braids smelling good. Just as you applied your shampoo, you want to massage the conditioner directly onto the braids, from top to bottom and rinse to finish.
Wrap your hair in a towel to soak up excess water. This helps speed up the drying process and prevents your box braids from getting too heavy.
To keep your braids fresh and odor-free, dry them thoroughly with a blow dryer. Don’t forget to get the roots and between the braids to prevent any moisture buildup.
Finish by replenishing moisture using natural oils. Apply lightweight oils directly to your scalp and along the braids to restore the oils lost during washing. This keeps your box braids looking fresh and hydrated.
We already recommended you to sleep with a satin bonnet, scarf or silk pillowcase.
Wrapping your braids whilst you sleep will keep them looking fresh, moisturized, and you protect the more fragile hair around your hairline.
We will explain two different methods for wrapping your box braids before sleep.
Also read: How To Sleep With Curly Hair: 6 Ways
Disclaimer note: if you use a square scarf; fold it at the corners so that it forms a triangle. If you use a longer scarf; create one long rectangle.

This method is for the ones who wants to keep your box braids smooth and straight. If you want to have a slight curl to your box braids, then method 2 suits you better.
Step 1: First divide your braids evenly into two halves. Make sure that they don’t have any tangles and do not pull them too tightly. This can damage your roots and hairline.
Step 2: Cross the two halves of your hair over – leave one half on your shoulder as you work on the other half.
Step 3: Take all of the braids on the half you’re working with, and secure them with a hair tie – including all the short braids.
Step 4: Repeat on the other side.
Step 5: Take the halves and cross them over each other at the back of your head before bringing them to the front of your head. Secure these ends together with a hair tie.
Step 6: Grab your satin or silk scarf and cover your head with it. Tie the ends together at the back. You can add a bonnet on top of this for maximum coverage.
Step 7: Tuck all your loose ends into your bonnet or scarf.
This method will add more bounce or volume to your box braids while you sleep.
Step 1: divide your hair into two halves. Secure each with a hair tie.
Step 2: use satin or foam rollers. Then roll the ends of the braids up. Don’t roll right the way up, this may cause tightness and discomfort.
Step 3: tie your scarf around your head. Cover with a bonnet and tuck in any loose ends or strands.

When it’s time to take your box braids out, the worst thing you can do is rush. Make sure to set aside enough time for the process so that you don’t damage your natural hair. Here are the steps to unraveling your box braids the right way.
Start by spraying your box braids with warm water to soften the braids. Then use a detangling product to add some slip to your curls. Work in sections to prevent your hair from drying out while you take down the box braids.
We start unravelling the box braids at the bottom. If you have extensions you can cheat by cutting the bottoms. But make sure you will leave enough space to where your natural hair ends. Remember that your hair has probably grown so don’t cuff off too much.
As you unravel the box braids, apply more detangler to help the process along. Use a wide-tooth comb or your fingers, always starting from the bottom and moving upwards. Some hairdressers use a bit of nail glue at the ends of each loose curl to prevent unraveling, but this step is optional.
After you’ve removed all the box braids and extensions, it’s time to nurture your natural hair. Follow up with your regular hair care routine, making sure to cleanse your scalp thoroughly and deep condition for hydration. This helps restore moisture and keeps your hair healthy after wearing box braids.
Also read: 5 tips for deep conditioning your hair using the curly girl method

Box braids are a protective hairstyle that has become incredibly popular in today’s fashion world. Once rooted in cultural tradition, they are now worn by people from all walks of life. One of the best things about box braids is the variety of styles you can create, from long and flowing to updos and buns. Plus, once they’re in, they’re a low-maintenance hairstyle, making them a perfect choice for those on the go.
If you have any questions, let us know in the comments!


3 Comments
Hi,
Thanks for your kind comment! 💜
Xoxo team Kurlify
Very helpful. I tried tying for my daughter.
I can’t wait to try it out and rock those beautiful curls.